Showing posts with label #SSSWchallenge. Show all posts

Sunday, 13 August 2017

Jungle Birthday Party

Hi, Peeps!
I have a very special project today on my blog. 
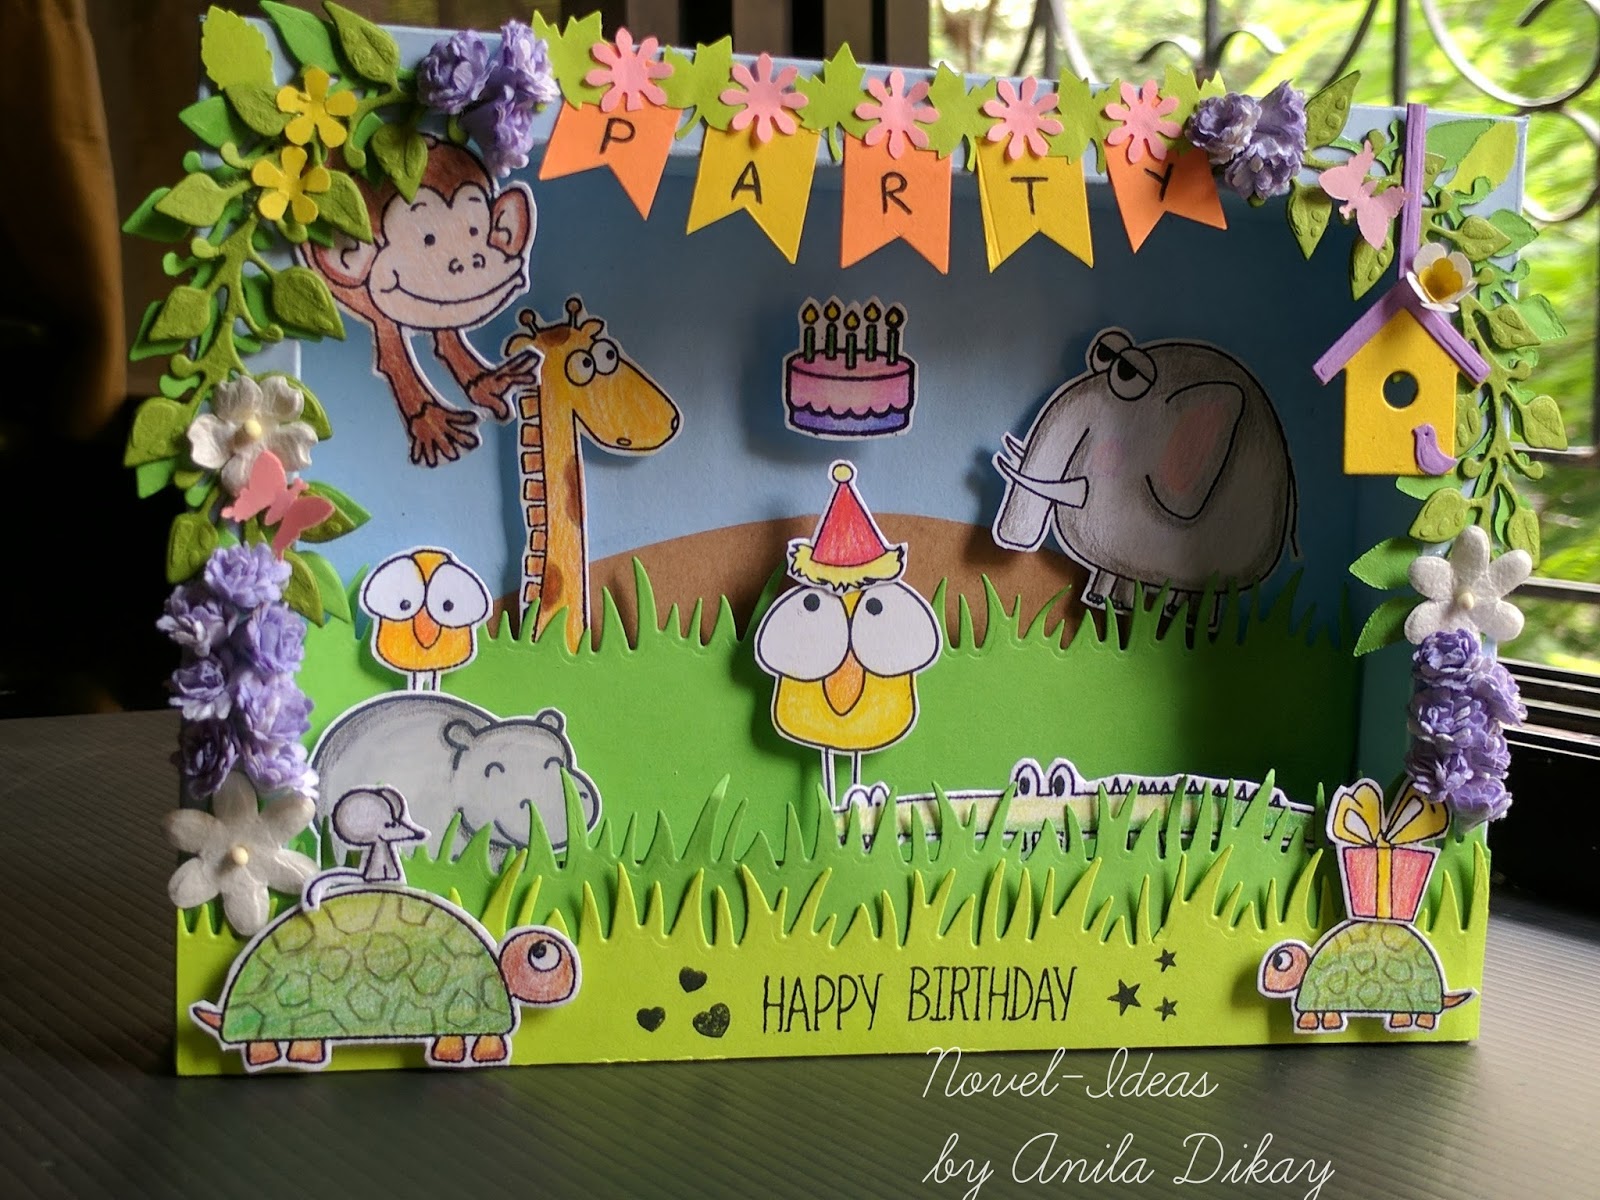
A (shadow) box card depicting a Jungle Birthday party. A Perfect gift for any child. 

Let us first see the project.


I began with making a shadow box with a cardstock. I have a tutorial here, for making the shadow box right from scratch. 
I stamped the animal/cake/cap images with the "Stacking Animals" set from Simon Says stamp, Hippo from the "Hippo Birdie - Year Four" by Lawn Fawn, Cake from "Elphie Selfie" from LanFawn and Monkey/birthday cap from Craftyscrappers. 

(How many animals could you find...?? :-D)

Coloured all the images and fussy cut them. 


Die-cut the grass strips from "Grassy border" die from Lawn Fawn. Stamped the sentiment from "Magical Birthday" stamp set of Simon says stamp on a grass die-cut. Die-cut some leaves, butterflies and a bird-house. 


Arranged and mounted all the elements on the shadow box created a Jungle scene. For the top, I cut few strips of paper to make a banner and wrote"PARTY" on it. 
Filled in all the gaps with flowers from my stash. 


Check this video


Friends, I know the post has a lot of pictures... I wanted to capture the entire feel of the Jungle scene..though I was still not happy with the effect :(

Any inputs and your valuable feedbacks are welcome.

Thank you for dropping by my blog!

Linking this project to
trimmiescraftchallenges - Anything goes

Saturday, 18 February 2017

Shaker Fridge magnets

Hello, everyone!
I am so very happy to share a very fun-filled and very cute creation with you all. 
Die-cut fridge magnets! 

I had lots of fun creating these magnets. The most important and fun part about this is that these fridge magnets can be made in absolutely any theme. 
You think of it and it can be done.
Just imagine!!
These can be a wonderful gift for kids. 

Sit back and enjoy the post.
(Warning - This is a picture heavy post!!!)


Owl Magnet !!
This is a shaker magnet. I have used green and brown shaker elements to give the effect of nature. The die-cuts are also green coloured. A die-cut leaf is attached with an owl sticker embellishing it. Attach a magnet sheet from behind.


Little Birdie!!
This is again a Shaker magnet. I have stamped the birdie image and the sentiment on the inside and used tiny heart die-cuts as the shaker elements. Flowers are used for embellishing. Attach a magnet sheet from behind.


Nemo Magnet!!
The Nemo-magnet is a scene magnet and not a shaker magnet. All the elements inside are stuck on the inner paper. The fish goes on the top. This gives a great 3D effect in actual (unable to catch that in the photo) Used Chevron print blue paper inside to give the water effect. Attach a magnet sheet from behind.


  Flower magnet!!
Again a Shaker magnet. Stamped a sentiment inside and used tiny floral shaker elements. Embellished the magnet with some beautiful flowers. Attach a magnet sheet from behind.


There they are!! My Fridge magnets!!!

How do you like them? So when are you trying your own? 
Do let me know if you ever try them!
Please do leave your feedback in the comments below, would be absolutely delighted to read through them. 

Materials used - 
  • Scalloped thin cut dies from Itsy Bitsy
  • Pretty in pink and Aquarelle chevron papers from Itsy bitsy.
  • Stickers, flowers, sentiment stamps from Itsy Bitsy
  • Magnet sheet
  • Shaker elements etc.

Regards,
Novel-Ideas
Anila Dikay


I am linking this project to
Itsy Bitsy challenge #2, 2017 
Simon says stamp - Monday challenge - Favorite tool (Sizzix die-cut machine)
Simon says stamp - Wednesday challenge - Fantastic floral (The pink magnets are embellished with flowers)
Scrapping for fun - Anything goes
Abit more time to craft - Anything goes
A perfect time to craft - Anything goes
HLS - Anything goes with dies
cutitup challenge - 115 - Bendy or scene cards
diecuttindivas - Valentine colors - challenge # 304
diesrus - spring time


Friday, 10 February 2017

Valentine's day cards

Hello Everyone!!!

Today I am sharing few cards which you can quickly put together for the Valentine's day !!

Card 1 


  • Take a white base cardstock and adhere the patterned paper to it. 
  • Stick a die-cut circle with foam adhesive.
  • Add the sticker and the sentiment.

Card 2


  • Take a white base cardstock.
  • Stick 2 strips of pink colored washi tape. (I have used Polka dots)
  • Adhere a die-cut circle with sticker upon it. 
  • Add sentiment sticker. Put two tiny hearts to add some elements.

Card 3


  • Take a white cardstock and adhere a patterned paper to the lower half of it.
  • Cut a border design (a part of the paper pack) and stick it over the patterned paper. 
  • Adhere a die-cut circle with sticker upon it. 
  • Add sentiment sticker. Put two tiny hearts to add some elements.

Card 4 


  • Take a white cardstock (little smaller than 4x6)
  • Dry emboss it with the embossing folders.
  • Mount this paper on a cardstock.
  • Cut a piece of patterned paper and adhere it in the centre of the card.
  • Put a sticker with a sentiment on the pattern paper.  
  • Add few glitter drops.

Card 5


  • Take a red cardstock (little smaller than 4x6)
  • Dry emboss it with the embossing folders.
  • Mount this paper on a cardstock.
  • Die-cut a scalloped square paper and adhere it in the centre of the card.
  • Adhere stickers on the scalloped square along with 2 tiny hearts.
  • Add sentiment sticker. 

Card 6


  • Take a white cardstock.
  • Stick a patterned paper to it, leaving a tiny border from all sides.
  • Die-cut a circle big enough to add some shaker elements.
  • Stick patterned paper on the top of the circle and foam adhesive to the bottom.
  • Pour some shaker elements in the centre of the base card.
  • Attach the circle over it. 
  • Stick 2 hearts and a sentiment stickers. 

    In place of die-cuts, you can also use some a simple circle and square shape. 
    The cards super easy and It's great fun making these cute little cards.
    Aren't they adorable....??

    Thank you for dropping by my blog.
    Do leave some love in the comments below I truly enjoy them.

    Regards,
    Novel-Ideas
    Anila Dikay

    Linking this project to -
    AAA cards - Shape your love
    The paper players - Will you be my Valentine?
    Die-cut-divas - February is A month for Using Red or Pink
    Simon says stamp - Wednesday challenge - Cute
    Simon says stamp - Monday challenge - Young at heart
    Scrapping for fun - Friends, love, wedding. valentine
    w&w 3rd Birthday Bash | Cute Critter Challenge with Gayatri
    Happy little stampers -  anything to do with dies The card concept - Love and Romance

    Indian Craft room


    Pink and main challenges - Love 


    Wednesday, 25 January 2017

    Valentine's card - You make my heart sing

    Helllooo!!!

    Valentine's fever everywhere. I am also having Valentine's shaker card on the blog today.

    A quick look at my today's card.


    • Took a Patterned paper, mounted it on a white cardstock. 
    • Cut a shaker window together for both the layers.
    • Put acetate sheet and add foam double tape.
    • Put shaker elements in the window. Stick one more acetate sheet on the window to seal it.

    • Take the base card. Cut same size window on the base cardstock.
    • Mounted the shaker card on this card stock.
    • Stamp a message on the inside panel.
    • Decorate using embellishments.
    Here are few more pics... 


    Thank you for dropping by :)

    Novel-Ideas
    Anila Dikay


    I am entering this project into...
    • Paruscardmaking challenge - Anything goes

    • Scrapping for fun - Spots and Dots
    • Simonsaysstamp - Wednesdaychallenge - Anything goes
    • Thecardconcept - (Red-white colour combo)


    Monday, 23 January 2017

    Flip album

    Hello!! Everyone!
    Today on the Blog, I am showing you my new project.... A Flipbook!!

    This is the first time I am making one, so there are going to be some mistakes along. Please feel free to point out anything I have done wrong or can do better so that I can implement it in my further projects. 

    Here we go....


    This flip book measures around 4" x 6".

    • Took a 12" x 12" black cardstock and cut it into 2 halves. Each part I scored at 4" intervals. I had 2 parts with 3 panels each.
    • I took a strip of black paper measuring 1"x6". Folded it into half and used it to glue the two parts together. The inside of the album is ready now.
    • I then took 2 pieces of cardstock, this time a little taller than 6" but 4" wide.Covered this piece with patterned paper and stuck it on the first and the last panel of the album. (Sandwich a piece of satin while doing this on either side)
    • I then cut n stuck the patterned papers on all the inner panels (Size little less than 4x6 so that a black border can be seen all around.)
    • Made a pocket on one of the panel to insert tags.
    • Then came the embellishments, stickers, laces, sentiments, flowers etc.
    • On the cover page of the flipbook, I made a small photo frame, embellished it with a stamped message.
    • A bird on a tree chipboard adorned the cover page.  
    TADAA... My flipbook is ready!!!

    Here are some inside pics...


    I am really happy with the outcome. Friends, please do leave me your feedback or any suggestions on the same.

    Regards,
    Novel - Ideas
    Anila Dikay

    I am entering this project for the following challenges - 

    • crafty calendar challenge - Something new (Tried a flipbook for the first time... triend something new ;-))
    • crafty creations challenges - Anything goes
    • crafty girlz challenges - Anything goes
    • crafting with an attitude - Anything goes
    • craft rocket challenges - Add a bow (My flipbook is held together with a bow:))
    • simonsaysstampblog monday challenge- Spread your wings (Birds and butterflies in the flipbook)
    • Inspiration Destination - Anything goes! 
    • simonsaysstampblog.com/wednesdaychallenge - Anything but a card
    • A Perfect time to craft - Anything goes!
    • A Bit more time to craft - Anything goes!