Wednesday 25 September 2019

Guest Designing for Stamplorations # 8

 Hello folks,

Time flies so fast!!
We are in the last (8th) week of the Digital Wednesdays by Stamplorations.
I am sure you all enjoyed this beautiful journey along with us.
Thank you, Shery for this wonderful opportunity!!

I am here with two new projects for the same.

My first project is a card. 
I have used a card front image from the Cupful of Blooms digital stamps - Set of 6


I coloured the image with Zig markers and fussy cut it. On a card base, I added some watercolor stripes. Foam mounted the image on the base. Added the sentiment.


My second post is a set of Birthday tags.
These tags are the bonus printable tags from the Spring Time blooms and Coffee digital stamp.


I coloured the images of the tags using Zig markers and fussy cut them. 
On some ready tags, I stencilled some designs using Sparkle paste. 
Foam mounted the fussy cut images on the stencilled base. Added a sentiment.


Thank you for stopping by!

We can still be in touch :))

Follow me here!

Remember to hop along and leave comments on all the Guest Designer's blog to stand a chance of winning $15 to the Stamplorations stores.

Monday 23 September 2019

MFT CAS card

Hello


I have used the Geometric greenery stamp set.
Stamped the images, Coloured with Zig markers and fussy cut them.
Adhered on a card base and added a heat-embossed sentiment strip.

Thank you for stopping by!

Follow me here!


Sunday 22 September 2019

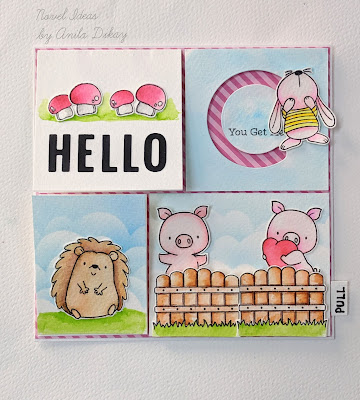
Multi-action (MFT) card

Hello friends!
I am at the blog today sharing a Multi-action card (yeah... that's what I have named it...lol) with multiple interactions on it.
This 6"x6" square card features 4 interactive sections on it.
It is a picture heavy post with no description as such.
All products used are by MFT


I made this card for the MFT Card Design Superstar Innovative Master contest.

The card features 
A Pop-up 
A spinner 
An easel and 
A slider card

 I did not have any specific dies to make any of the interactions except for the Spinner. I have used the MFT spinner die to make that part. All the remaining three are made using some very basic techniques. I have shown the same for the Pop-up and the Slider ones. 
I have shown the steps in the pictorial collage.

The pop-up part
Giving a cut to the cardstock and pushing the parts inward so that they pop up inside. Adhere images to it.


The Spinner 


An Easel


A slider
Cut a slit to the base. Pass a strip from under with another small piece of cardstock adhered to it. This small strip pops out from the slit and the image goes over it. 


Final image


Check this video to understand the interactions


Thank you for stopping by!

Follow me here!


Saturday 21 September 2019

Ink # 196 Paper Piercing

Hello everyone!!
It's time for a new challenge over at Inkspirational Challenges.
The theme this fortnight is "Paper Piercing"


One may confuse this with "Paper Piecing", but apart from the obvious difference in the spellings, the technique is far apart from each other.

In Paper Piecing we put together pieces of colorful/patterned papers in various shapes/designs. whereas, Paper Piercing involves piercing of the paper in the form of stitching or using piercing dies.

Today, I am sharing a technique for this using some basic supplies available around us.  
Here's my card for the same.

Over to the tutorial.
Take any stencil which has clean and simple outline/design. Try to avoid intricate designs. Secure it on the cardstock using washi tape. 
You may also use any outline stamp design and lightly stamp it in grey ink.


Take a scrap piece of foam, and place your card over it. 
I am using a piece of foam which normally comes in the packing of shirts/bedsheets. It just needs to be thick enough. 
 Next, I took a drawing compass (normally available in the Geometry boxes) 


I started piercing the paper by pushing in the needle of the compass. 
Here, one can take a needle instead of the compass. It all depends on the thickness of the pierced holes you desire.


The piercing is now complete. 


Next step would be adding the other details. I decided to use Distress oxide to highlight the details.


Lightly brushed over the stencil till I got the desired effect.


Next step was the face details. 


This completes the image.


Foam mounted this panel on a card base with some washi tape strips under it on one side.

Final images


Please hop over the Inkspirational challenges blog to check out some beautiful inspirations. 

Thank you for stopping by!

Follow me here!


Friday 20 September 2019

Mini Watercolour cards

Hello friends!
A set of mini Watercolor cards as a part of my DT assignment for Itsy Bitsy craft store.

My friends must have already seen these cards on my Social media platforms.

Sharing a quick preview of the same!

CARD 1

CARD 2 

CARD 3

 CARD 4 

Please check out this video on my Youtube channel to see the process of how I made these cards. And if you like them please subscribe to my channel :)

Thank you for stopping by!

Follow me here!


Linking to the following challenges-
(Cards 1 & 2)


Wednesday 18 September 2019

Guest Designing for Stamplorations # 7

Hello friends!
Digital Wednesday is back again at Stamplorations. 

I have two projects to share today.

My first project is a Card and a tag set using the Bloomdala coffee cup set of 6


The images are colored using Zig markers. 
For the card, I blended some Squeezed Lemonade Distress oxide on one side of a card panel. I added a darker color through the Mini leaf stencil over this part.  Assembled the card together.
For the tag, I fussy cut the coffee mug and one more card with it in the cup shape. Punched a small hole to both the pieces and added a brad to make a small openable tag.


The second project is a mini 4"x4" card using Cupcake Blooms and Coffee digital stamp


Image is colored using Zig markers. 
I have added a matt of the dry embossed panel under the image.


Thank you for stopping by!

Follow me here!

Remember to hop along and leave comments on all the Guest Designer's blog to stand a chance of winning $15 to the Stamplorations stores.


Wednesday 11 September 2019

Heart of Gold

Hello friends!!

Life has really been busy these days. 
With a lot of pending commitments, it is difficult to find time for smaller and enjoyable projects. But, I did make time for this one!!

This is a quick, CAS card. 


I have used this die called "'Heart of Gold" by Neat and Tangled. 
I die-cut the heart using Gold mirrored cardstock, keeping all the negative pieces together. (Heart of gold cut in Gold... lol)
I stuck the heart on a sheet of vellum and fussy cut the sheet in the heart shape. 
I adhered a few of the negative pieces in place, on the vellum.

The adding of the negative pieces not only gave a unique look to the heart, but it also helped in adhering the heart/vellum on the card base. I added glue only to the parts covered with the foiled cardstock and adhered the heart on a card base.

Lastly, stamped the sentiment on it.


Thank you for stopping by!

Find me here!


Linking to the following challenges-