Thursday, 28 September 2017

Celebrate Autumn

Hi Friends!

One more card for Autumn.
I could not stop my self as I love the Autumn colours and I love the transition shades of the leaves in nature.

Here's my card


Steps followed for this card
I took various leaf stamps from my stash. 
Stamped the leaves with various dye inks of green, yellow and orange shades on a card panel. Adhered the panel to a card base. On a circle die-cut, stamped the sentiment. Placed a black thread randomly. Mounted the sentiment on the card with foam adhesive. Lastly, added few sequins to complete my card.


Thank you for checking this out too. 
Do leave your valuable feedback.

Linking through the following challenges 


Celebrate fall - 1

Hello friends!

It's Autumn time at many places across the world. 
Though here in India, we do not celebrate Autumn, somehow the fever has caught on. 

You see autumn cards everywhere. 
I too have two cards today here with the Autumn theme. 


Card 1


Steps followed for this card
Placed the card panel in the Stampoholic and arranged the background stamp over the panel. Inked the BG stamp using various distress inks, namely Scattered straw, Fossilized amber, Wild honey and Carved pumpkin respectively. Spritzed with water. Stamped on the card panel. Repeated the same for the desired colours. Adhered the card panel on a card base. Adhered a piece of vellum across the top. Die-cut the sentiment twice and layered it to make it look 3D. Mounted the sentiment on the vellum and covered it with a layer of Glossy accent. Added dew drops to add some element. 


 Card 2


Steps followed for this card
Placed the card panel in the Stampoholic and arranged the background stamp over the panel. Inked the BG stamp using various dye inks of green, yellow and orange shades. Stamp on the card panel. Repeated the same for the desired colours. Adhered the card panel on a card base. Die-cut a heart and distressed it at the edges with Scattered straw DI. Stamped a bird and coloured it. Adhered the heart to the card using foam adhesive. Heat embossed the sentiment on a black strip, using white EP. Adhered it across the heart. Lastly added few glitter hearts to the die-cut to add some element. 


Materials used for the cards are
Bielo CS
Coloured card base
Hero Arts Cling BG stamp
Distress Inks
Dye inks
White EP
Sizzix Thinlit celebrate die
Heart die
Birdie stamp from Simon says stamp
Dew drops

Thank you for dropping by my blog. 
It is always a pleasure to read your thoughts about my work.


Linking through the following challenges 


Monday, 25 September 2017

Thank you card

Hi!
A simple quick card today!
A card for times when you do not pre-plan (Lol) and need to create something at the last minute. This card does not have any design as such, yet it looks very pretty. The colours tend to make it look more lively.

Here's a look!


For this card, I have used the Geometric Greenery stamp set from MFT. 
I created the BG on a white card panel, by stamping all the sentiments from the stamp set with various coloured dye inks. 
I die-cut the big "Thank you" sentiment twice and layered it to form a 3D sentiment. 
Adhered it to the card panel. 
Mounted the panel on a white card base. 
Lastly, added glossy accents to the die-cut sentiment to highlight it. 

More pictures


Thank you!

Entering this card in the following challenges

Saturday, 23 September 2017

How've you bean

Hi!

Here I am using a digi by Sayaki Glitter


Image may contain: text

Check out the awesome collection of digis at their shop here

Here is my card.


 I printed and coloured this digi named "Mouse and Hedgehog"
Die-cut the digi using stitched rectangle die. 
I took a watercolour Fabriano card panel and watercoloured uniform strips of yellow colour. 
Adhered this watercoloured panel on a grey card base. 
Mounted the die-cut digi on this card. 
Stamped the sentiment and die-cut it using a heart die. 
Punched a tiny hole at the top of the heart. 
Tied a string through it. Pasted the loose end of the string around the top. 

Few more pictures


Thank you for checking out my card.
Hope you enjoyed it.


Linking my card through
2017 fall hop

Positivitea

Hi!
I have been making few coffee cards, these past few days, to enter in the Coffee loving cardmakers fall blog hop
But being an ardent tea lover myself, it would be unjust to not make a tea card. 

So today's card has a cup of tea - Positivitea!! 

Here's my card!


I wanted the sentiment of this card to reflect the positiveness of having the morning tea. I typed the sentiment, formatted and printed the sentiment on a white card panel. 
I stencilled the rays using Fossilized Amber DI. 
I stamped, coloured and fussy cut the cup from the Fiskars Latte love stamp set. 
Stamped the vapours on the card panel. 
Adhered the cup on the card. 
On a white card base, I put a strip of washi tape on one side and mounted the card panel over it. 

Few more pictures


How do you like my card?
Do leave your feedback. I love reading through your comments.

Thank you for dropping by.

Linking my card to the following challlenges

Friday, 22 September 2017

Perfect blend

Hi!
I am herewith one more card for the Coffee loving Cardmakers Fall blog hop.

For this card, I am using the freebie Coffee time Perfect blend offered by the Bugaboo Stamps.

Here's my card!

I began by printing the digi on a white CS. Coloured the digi with my pencil colours. (I have used simple/basic pencil colours) Die-cut the digi with a stitched circle die. Stamped the sentiment at the bottom of the die-cut. I distressed the edge of the die-cut using Fossilized amber DI. On the front panel a pastel green card base, I tied a twine. Adhered a yellow coloured doily on it by keeping the edges of the doily open (not sticking them) Adhered the circle die-cut over the doily using foam adhesive. Lastly, added few dew drops to finish my card.

One more look at the card!


Thank you for dropping by my blog. 
Do leave your valuable comments below.

Linking my card to the following challenges

we blend perfectly

Hello!!

Here's my card!


For this card, I have used the Fiskars Latte love Clear stamps set.

I took a white card panel, die-cut a stitched circle from the centre of it. Used the panel for this card. I took the coffee beans stamp from the set and stamped them randomly with brown pigment ink around the circle. I adhered a small yellow coloured card from the backside of the panel so as to cover the die-cut circle. Stamped the sentiment in the centre. I stuck a strip of gold washi tape around the panel (only two corners are seen in the picture)

On a brown Card base, I adhered a beige coloured panel. The white card panel was mounted over this. On a white CS, I stamped the coffee cups, coloured and fussy cut the cups. I adhered the first cup on the card, overlapping the die-cut circle. Mounted the second coffee cup with foam adhesive overlapping the first cup. 
Lastly, added few sequins to complete my card.

Another look at my card!


Thank you for dropping by my blog.
Do leave your feedback in the comments below!


Linking my card to the following challenges

Wednesday, 20 September 2017

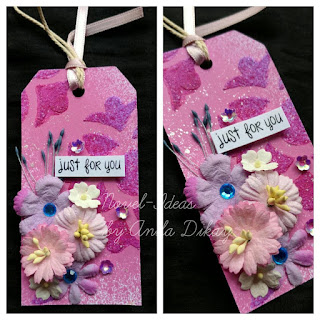
Shimmer tags

 Hello friends,

Today I have a set of tags on the blog today. I am sharing a tutorial of these tags.


 Here's a look at them.


To begin with, I took white coloured ready tags...You can even cut them from a white CS.

Take the tag, secure it on the table with washi tape. Secure the stencil over the tag with washi tape. Take sufficient shimmer paste (Separate stencil and shimmer paste for each tag) and evenly spread it across/through the stencil. 


Repeat the same for all the three tags. After applying a generous layer of the shimmer paste, I let it air-dry. (You can heat-set it) 


Once dry I sprayed two of the tag with the coordinating shimmer sprays from my DT kit. (Spray each separately)
The shimmer pastes and shimmer sprays are extremely versatile and beautiful in itself.


For the third tag, I coloured the background using distress ink. 
(Applying DI on the craft mat and picking up the colour with water brush) 


Let the tags dry again


Next, I started layering the tags with pollens and lots of flowers.


I tried to use the matching coloured flowers and pollens for each tag.


I stamped a sentiment for each tag from the stamp sets and mounted them on the tag using foam adhesive. I tied twines along with coordinating ribbon through the punched hole. Lastly added matching sequins to add some elements. 

Here's few more pictures of the tags


It was really exciting playing with the shimmer pastes and the shimmer sprays. 
To buy these shimmer sprays and shimmer pastes hop over CraftyScrappers.
Can you tell me which tag is your favourite?
Do leave your feedback in the comments section. 

Love to hear from you. 
Linking to the following challenges
Simonsaystamps - Monday challenge - Shimmer and Shine